Showing posts with label photography tips. Show all posts

Tuesday, December 7, 2010

Photography Tip: Lens Length and Portraits

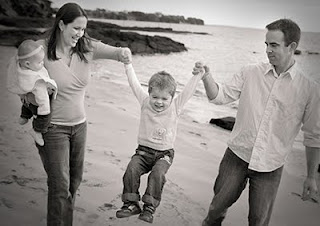
Your choice of lens length (wide angle, normal or telephoto) has a big effect on the way a person's face looks when you photograph them.

Take a look at these two images of my son Zachary. The only significant difference between them is lens length, coupled with the distance between the subject and the camera.

The first photo was taken with a 70mm lens (on a camera with a full frame sensor). This is quite a standard lens length choice for a portrait.

For the second photo, I came much closer to Zac and photographed him with the lens at 38mm. This is unusually short for a portrait, and the result is quirky. When you stand this close to a person, their nose and chin loom towards you, their eyes look big, and their ears and shoulders look small. Overall, their face looks slimmer.

It's not actually a distortion caused by the lens - you can see this effect with your very own eyes if you look carefully. Perspective is emphasised when you stand close to your subject.

I believe that every person has their own 'ideal viewing distance'. A person with a slim or long face will benefit from being photographed with a long lens from a distance (try 120mm or even longer). The flattening effect will suit them well.

A person with a round face will look more attractive when photographed from closer range, with a shorter lens (try 50mm).

A short lens length is also great when you want your portrait to have a slightly ridiculous feel to it. That's how comedians get those fun, quirky portraits of themselves!

Tuesday, January 26, 2010

Behind the Image - Fashion Victim

I thought I would share with you the story behind some of my award-winning photos. I first imagined this image back in the year 2000, when I was working with a photographer doing fashion shoots in San Francisco. I wanted to create an image that said something about the dangers of body image pressures on young women.

I finally shot the image in 2008 with Kate, our lovely babysitter who gallantly agreed to lie on our kitchen floor while I took photo after photo and asked her to place her limbs in some pretty uncomfortable positions!

This is the original capture. It took many many hours of Photoshopping to create the final tortured fashion victim that I had pre-visualised.

I added back in the make-up brushes that had been in an earlier shot and added a cool tone.

Then I changed the colour of the hairdryer and thinned my model, who, I am happy to say, was a healthy slim build rather than the emaciated girl I needed.

Finally, I decided to throw her head back further, and intensify the blue.
I see Photoshop as a powerful creative tool to help me communicate my message effectively. This image won silver at the NZIPP Iris Awards 2008, silver with distinction at the Australian APPA awards 2009, and was published in Her Magazine, Prodesign and the North Shore Times.
PS The nail polish did leave a nasty stain on the aged linoleum - but it was worth it.

Monday, January 11, 2010

Photography Tip - Slow Synch


I want to share with you a really cool photographic technique using flash. It's one of my absolute favourites. It can be used for any kind of flash, whether it's a camera-mounted speedlight or a studio flash.

The technique is called slow synch or dragging the shutter. You may know that your camera has a maximum shutter speed that you can use when firing a flash. This is the 'synch speed' and is commonly between 1/125 and 1/250 of a second. You cannot use a faster shutter speed than this (unless you use a special feature called 'high speed synch' - we won't go into that here).

You can, however, go slower!

There are two really great reasons for using a slower shutter speed with flash. The first is that you can combine a frozen image with blurred movement. You can get a nice sharp portrait of a person, created by the pulse of light from the flash, and show motion blur as well. Perfect for the greedy photographer - it's like having your cake and eating it too!


Try it with the camera mounted on a tripod for a sharp background or handhold the camera to blur the background.

The second reason to drag the shutter is to balance ambient and flash. Basically, by using a longer shutter speed, you give the light in the environment (which is probably less intense than your flash) time to register on your sensor. This means that you can take a photo on top of One Tree Hill at night with your friend lit by the flash, and show the beautiful city lights behind as well.

If you would like to find out more about ImageMe photography workshops, please contact me on lisa@imageme.co.nz

Friday, November 13, 2009

Photography Tip - Horizons

Horizons usually look better in photos if they are straight. And I mean dead straight. There is nothing worse than a slightly crooked horizon - it just looks like a mistake.

Now if I said that I always shoot my horizons straight I would be telling you a giant porker - the truth is, they are rarely completely straight. Luckily, horizons are easily fixed in Photoshop.

Here is an image with the horizon slightly higher on the right-hand side.


First, find the ruler tool (it hides under the eyedropper tool).


With the ruler tool draw a line along the horizon.


Then go to Image > Rotate Canvas > Arbitrary. Press OK.

Your image will tilt. Now crop off the white bits and voila, you have a straight horizon.

Of course - rules are made to be broken. Tilted horizons can be fun but the mood of the image needs to suit - they work best with images with high energy, movement and excitement.


And remember, if you are going for a tilted horizon effect, make sure it's really tilted.